I won't try to pretend that I was anywhere close to understanding story points when we first started using them. I was confused. Were they a measure of time, complexity, a combination of both, or perhaps even something else? It wasn't just me either, as a team it was just something we couldn't get our heads around.
Our other issue was the relativity between stories. We had our baseline story that represented one point but were unable to say whether the one we were looking at now was say, 8, 13 or 20 times larger.
As ever in situations like this I sought help from the internet. Surely others shared our pain, had found a solution and blogged about it?! Well, it took quite a bit of searching! I found some techniques for planning poker sessions that seemed sensible on paper but we were still uncomfortable with what we were doing.
That was until I discovered two things. First was this excellent post from Martin Fowler. In short, it explains that a story point is a unit of effort. I recommend reading it if like we were, you're yet to realise (or want a refresher on) what a story point is.
The second discovery is Story Sizing. I'm unable to find the original article I found so unfortunately I'm unable to thank the person who wrote it. There are a handful of others out there but as I prefer simple, visual explanations, and I couldn't find any like that, I decided to write this post to explain it for others of a similar mindset.
The method
Preparation
The time it takes to do this will depend on a few factors. These include the experience that the team has in doing it, the quality of the stories, and of course the number of stories you have. We've managed to get it down to a few minutes per story.
It helps if you've done something like PSS already to ensure your stories already follow the INVEST guidelines.
Get the team (which for us includes BA's, Developers, Testers, the ScrumMaster, the Product Owner and when possible, customers) together in a room. You'll need some stories of course, to make it worthwhile I suggest a minimum of about 15. Have these written on sticky notes with the acceptance criteria on the back (or at least to hand if there isn't room).
Step 1 - Spread the stories out on the table
 |
| Click on image to enlarge |
Our sessions are normally facilitated by a BA who at this point may talk through the stories at a high-level. There's no need to discuss them fully yet.
Step 2 - Find an average looking one
There's no rocket science to this. As a team, pick a story that looks about average in terms of effort to take it from a few lines on a sticky note to delivery. Stick it in the middle of a wall.
 |
| Click on image to enlarge |
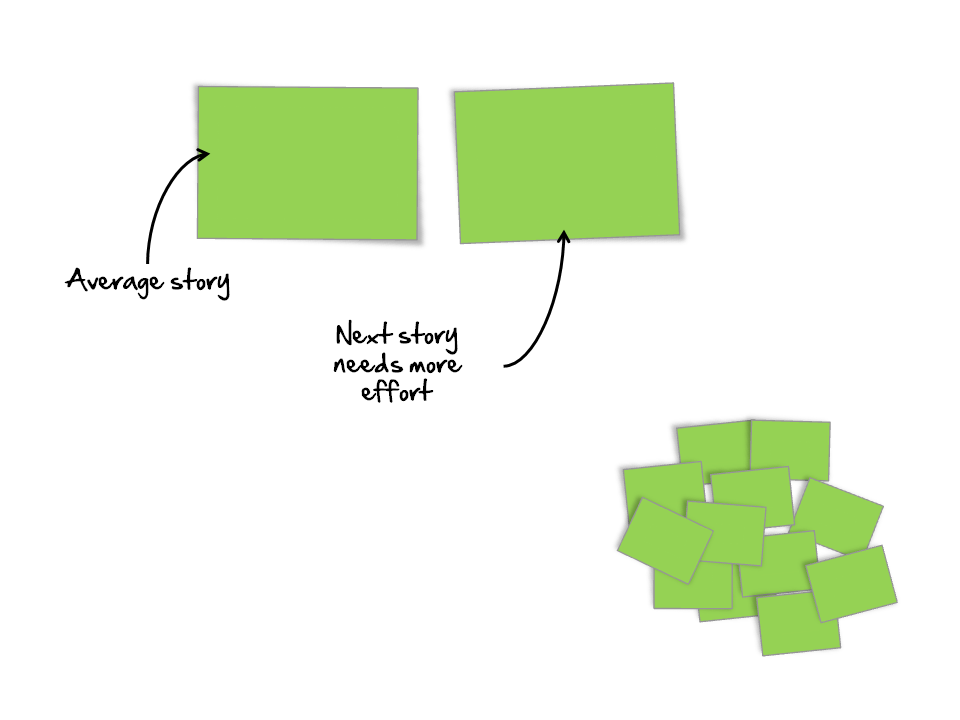
Step 3 - Compare it to another story
The facilitator will then pick any story from the table and the team will discuss it as they did for the last one. These discussions should be timeboxed - there may be a lot of stories to get through so keep that in mind.
Once discussed, the team can decide whether the story requires more or less effort to deliver than the previous one. If it's less, stick it on the wall to the left of the first one, if it's more then stick it to the right.
 |
| Click on image to enlarge |
Step 4 - Do it again
Randomly picking stories from the table, the team should discuss them and agree where on the wall they will be placed. Once you've gone through all of the stories you should have something like this:
 |
| Click on image to enlarge |
Step 5 - Establish your 1-pointer
If you're doing this for the first time on your project then your 1-pointer will be the story on the far left. If you've been doing planning poker before and have a benchmark from a previous session then as a team you need to agree where it would be placed on your wall. Wherever that is, place a different coloured sticky note with a '1' on it above the position:
 |
| Click on image to enlarge |
Step 6 - Find your 2-pointer
As a team you've already discussed all of the stories on the wall. Moving to the right of the marker just added, find a story that requires double the effort. Place another sticky note above it with a '2' on it:
 |
| Click on image to enlarge |
Step 7 - Carry on!
Continuing to move along the wall to the right, the next step is to find a story that requires about the same amount of effort as a 1-pointer and 2-pointer combined. Place a '3' above that.
Then, bearing in mind the effort to deliver a 2 and 3-pointer, find your 5-pointer. Carry on until you reach the right-hand-side story:
 |
| Click on image to enlarge |
Step 8 - You're done!
You probably can't draw on the wall but it'll be pretty easy to imagine lines like the ones in this image:
 |
| Click on image to enlarge |
Conclusion
This method works for us the vast majority of the time. It's not a solution for all occasions, it's hard to make it work with a small number of stories for example. I hope you try it, maybe enhance/adapt it so that it does work for you - it's a good tool to have!
I've created a slideshare presentation that you can view/download here. Feel free to use it, and if you do please let me know!
No comments:
Post a Comment